| | Urban ruin bases on the cheap.(Pic heavy) |  |
|
+3Ciirian Local_Ork Evil Space Elves 7 posters |
| Author | Message |
|---|
Evil Space Elves
Haemonculus Ancient

Posts : 3717
Join date : 2011-07-13
Location : Santa Cruz, ca
 |  Subject: Urban ruin bases on the cheap.(Pic heavy) Subject: Urban ruin bases on the cheap.(Pic heavy)  Wed Nov 30 2011, 03:33 Wed Nov 30 2011, 03:33 | |
| Had a request on the painting log asking how I did my bases. They are really fast, really cheap to do. Materials: -Cut up sprue material. -Plastic tube covers that come on paint brushes -Any sort of basing "gravel". I use Woodland Scenics brand. (Train modeling) -Sheets of styrene sheet. (Available at modeling shops. Usually about $3.00USD for a 1'X6" square. Sorry no metric measurement: We Americans are baffled by the metric system  ) -I also bought one of the City Fight Manufactorium buildings years ago. I've been cutting up the floor pieces for years to base models higher and for larger models. -regular Super Glue. I use Instacure brand, but use whatever is clever for you.  the last ingredient is fine ballast from Woodland Scenics. This is the new bag that I bought to replace the bag that I am almost at the end of. I bought the old bag in 2000 for $5USD. This is the 6th army that I have based in this way. That's less than a dollar per army for this stuff. CHEAP! 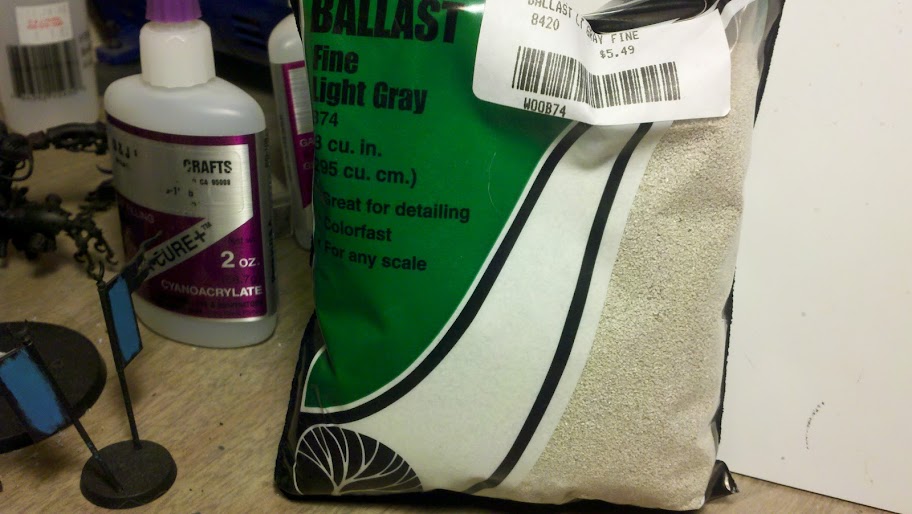 I then put a layer of Superglue on the base and put down the sheet chunks and sprue pieces. For models that I don't plan to elevate on the base I start by cutting up small sections of the styrene sheet to make wall chunks. 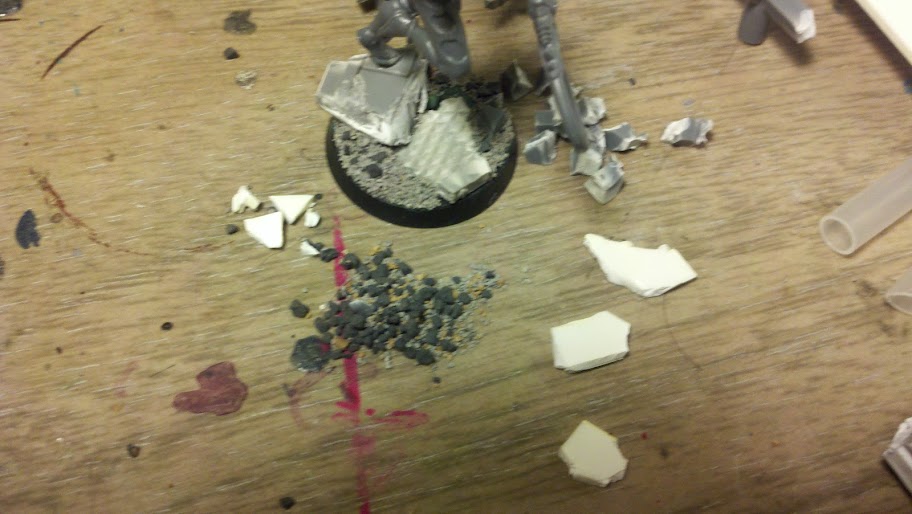  I then sprinkle some of the "gravel" while the layer of glue is still wet. Doesn't matter what color as I prime and paint it anyways. 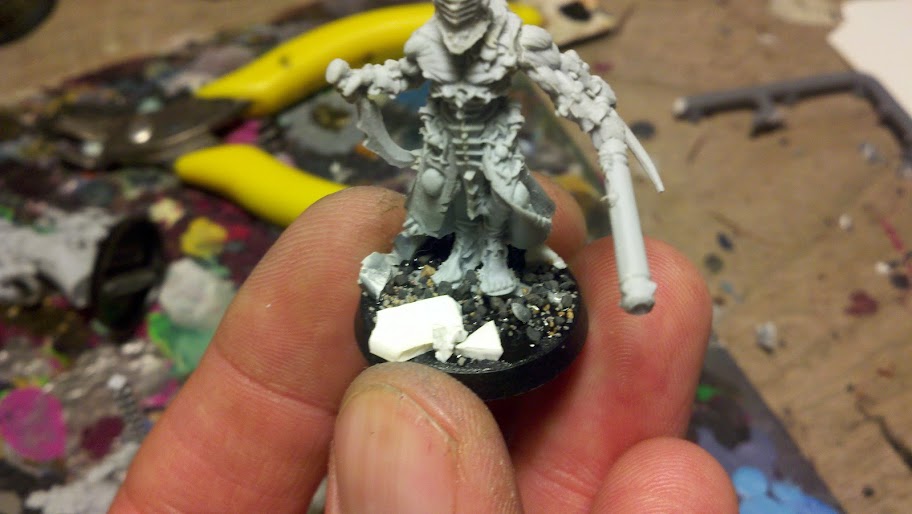 Last step-I then dip the model into a bag of the fine ballast. Pull it out, shake off excess. Sometimes I will add a spot of Superglue here and there as needed and re-dip the base into the ballast. 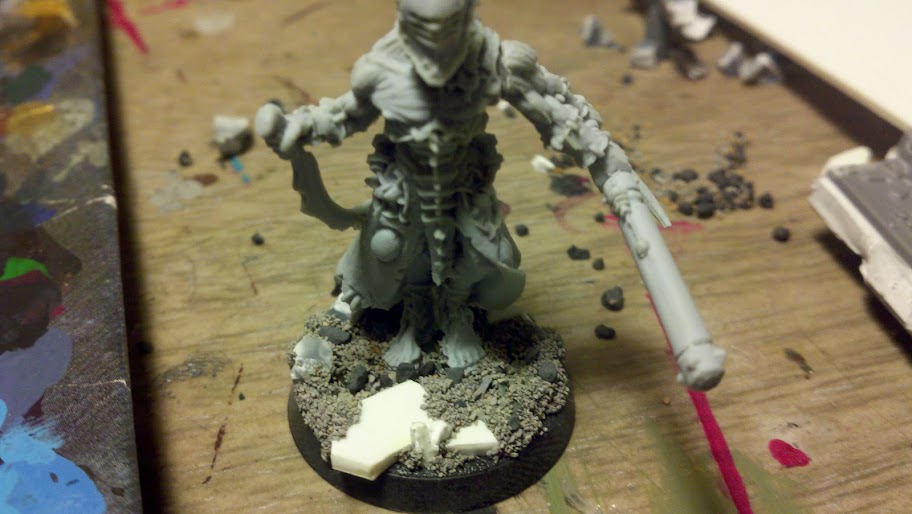  Voila. If I want to elevate the model on the base (Why are characters in the 40k universe always standing on something tall during battles?  ) I usually just cut up a chink of one of the City Fight floor sections. The "random pipe jutting out of the ground" effect is achieved by cutting the clear tube cover that comes with paint brushes at an angle. 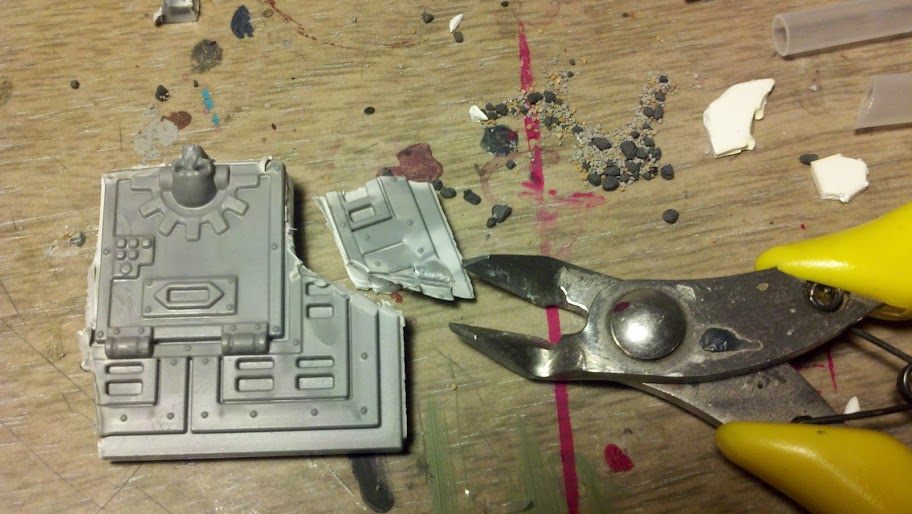 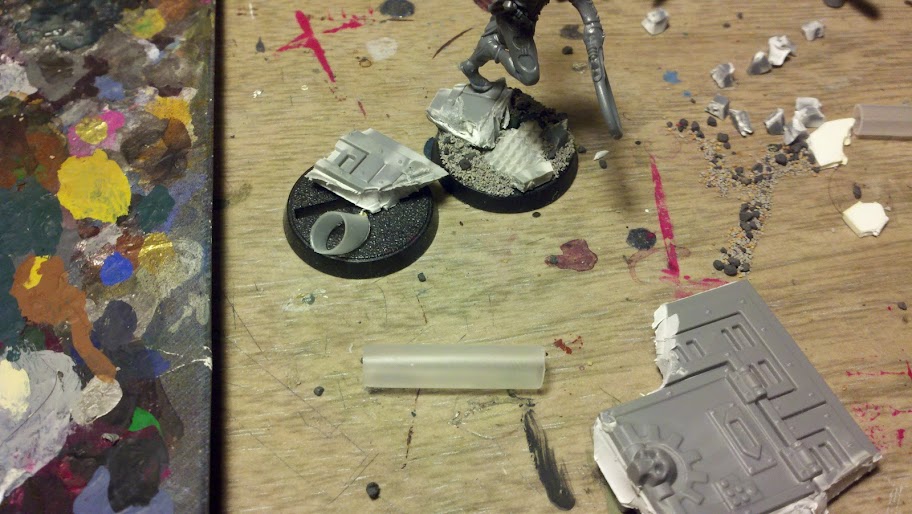 That's it. Seriously. It is cheap as Hell and is easy to do. I'll post how to paint them up tomorrow. Enjoy! | |
|
  | |
Local_Ork
Fleshsculptor

Posts : 1500
Join date : 2011-05-26
Location : Near good fight!
 |  Subject: Re: Urban ruin bases on the cheap.(Pic heavy) Subject: Re: Urban ruin bases on the cheap.(Pic heavy)  Wed Nov 30 2011, 10:57 Wed Nov 30 2011, 10:57 | |
| instead of plasticard, You can use CD boxes or even CD itself.  Also, tree bark  All of those can be found for "free" | |
|
  | |
Evil Space Elves
Haemonculus Ancient

Posts : 3717
Join date : 2011-07-13
Location : Santa Cruz, ca
 |  Subject: Re: Urban ruin bases on the cheap.(Pic heavy) Subject: Re: Urban ruin bases on the cheap.(Pic heavy)  Wed Nov 30 2011, 14:11 Wed Nov 30 2011, 14:11 | |
| I use tree bark all the time. I prefer styrene over harder plastics because you can "tear" it apart with clippers. It's not as brittle. Good call though LO. | |
|
  | |
Ciirian
Sybarite

Posts : 462
Join date : 2011-06-06
 |  Subject: Re: Urban ruin bases on the cheap.(Pic heavy) Subject: Re: Urban ruin bases on the cheap.(Pic heavy)  Wed Nov 30 2011, 14:28 Wed Nov 30 2011, 14:28 | |
| Bases are beautiful and seem much simplier than I had thought.
Great work, wish I thought out my basing better. All I did was glue GW sand down to the bases with the plan to paint and flock. | |
|
  | |
Local_Ork
Fleshsculptor

Posts : 1500
Join date : 2011-05-26
Location : Near good fight!
 |  Subject: Re: Urban ruin bases on the cheap.(Pic heavy) Subject: Re: Urban ruin bases on the cheap.(Pic heavy)  Wed Nov 30 2011, 14:28 Wed Nov 30 2011, 14:28 | |
| Good call about differences between plasticard and CD-boxes ESE.
I like CD boxes more because they crackle like "concrete" rather than bend&snap like "metal". However it's matter of preferences.
Gonna hook this to Tutorials... | |
|
  | |
Angrypeasant
Hellion
Posts : 47
Join date : 2011-11-14
 |  Subject: Re: Urban ruin bases on the cheap.(Pic heavy) Subject: Re: Urban ruin bases on the cheap.(Pic heavy)  Wed Nov 30 2011, 16:28 Wed Nov 30 2011, 16:28 | |
| Great tutorial ESE.  Another thing that I found works well are chopped up pieces of bases, and sprue bits. I had to rebase 40 odd skaven, and as a result of that, I had all of these slices of base materials. I used a combination of the bases, and some of the GF9 basing material.  (please ignore my banner... its a WIP!) | |
|
  | |
Evil Space Elves
Haemonculus Ancient

Posts : 3717
Join date : 2011-07-13
Location : Santa Cruz, ca
 |  Subject: Re: Urban ruin bases on the cheap.(Pic heavy) Subject: Re: Urban ruin bases on the cheap.(Pic heavy)  Wed Nov 30 2011, 22:19 Wed Nov 30 2011, 22:19 | |
| Cut up sprue bits are your friend for sure!
Nice Doomwheel. Makes me want to play Skaven! | |
|
  | |
Angrypeasant
Hellion

Posts : 47
Join date : 2011-11-14
 |  Subject: Re: Urban ruin bases on the cheap.(Pic heavy) Subject: Re: Urban ruin bases on the cheap.(Pic heavy)  Wed Nov 30 2011, 23:07 Wed Nov 30 2011, 23:07 | |
| Thanks  I finally got around to updating my signature... feel free to take a peek at the other Skaven pics! | |
|
  | |
Dez
Kabalite Warrior

Posts : 168
Join date : 2011-10-07
 |  Subject: Re: Urban ruin bases on the cheap.(Pic heavy) Subject: Re: Urban ruin bases on the cheap.(Pic heavy)  Wed Nov 30 2011, 23:14 Wed Nov 30 2011, 23:14 | |
| That's how I do my bases too, I love the way it comes out. Another item I use with sprue is a coffee grinder (DO NOT USE IT WITH FOOD AFTER) to make a nice texture:  | |
|
  | |
Gobsmakked
Rumour Scourge
Posts : 3274
Join date : 2011-05-14
Location : Vancouver, BC
 |  Subject: Re: Urban ruin bases on the cheap.(Pic heavy) Subject: Re: Urban ruin bases on the cheap.(Pic heavy)  Thu Dec 01 2011, 03:22 Thu Dec 01 2011, 03:22 | |
| Grrr, I tried the coffee grinder idea once after someone suggested it on another forum. The finer plastic particles found their way down into the gubbinz  I do my bases essentially the same ESE, some superglue and then a dip in a ziplock bag mix of different sized ballast from Woodland scenics. Little pieces of urban terrain or Beakie/IG vehicles also get used. For rocks, I often use plaster, just the cheap, quick-dry stuff from any hobby store. I pour a thin layer into the bottom of a Tupperware container, wait 10 minutes for it to set, then bang it out, toss it into a ziplock bag, and then smack that against something to break it into smaller chunks. It glues down quick and easy with superglue as well, and then I add ballast around it. | |
|
  | |
Evil Space Elves
Haemonculus Ancient

Posts : 3717
Join date : 2011-07-13
Location : Santa Cruz, ca
 |  Subject: Re: Urban ruin bases on the cheap.(Pic heavy) Subject: Re: Urban ruin bases on the cheap.(Pic heavy)  Thu Dec 01 2011, 04:31 Thu Dec 01 2011, 04:31 | |
| I like the plaster idea. @dez-coffee grinder? Sacrilege! Wanted to post the quick paint of these bases. -Materials: Adeptus Grey, Codex Grey, Fortress Grey, rotting Flesh Two Tank Brushes Thinned Brown ink-Not a fan of washes for bases. I use Citadel wash for a lot of things, but I've never been happy with it for painting bases. 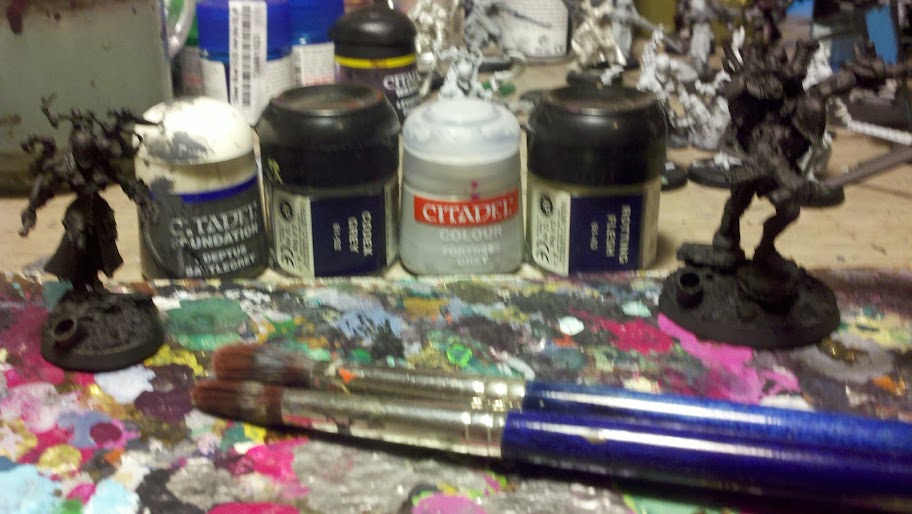 I do a quick drybrush with Adeptus followed by Codex Grey using the same brush.  sometimes I get lazy and use the same brush throughout, but I usually switch to the second tank brush and do a quick and light drybrush with Fortress Grey and Rotting Flesh.  I then paint any metal details or other stuff at this point. I use Boltgun Metal thinned with a little Badab Black wash and Gnarlac Green patched on the pipe. 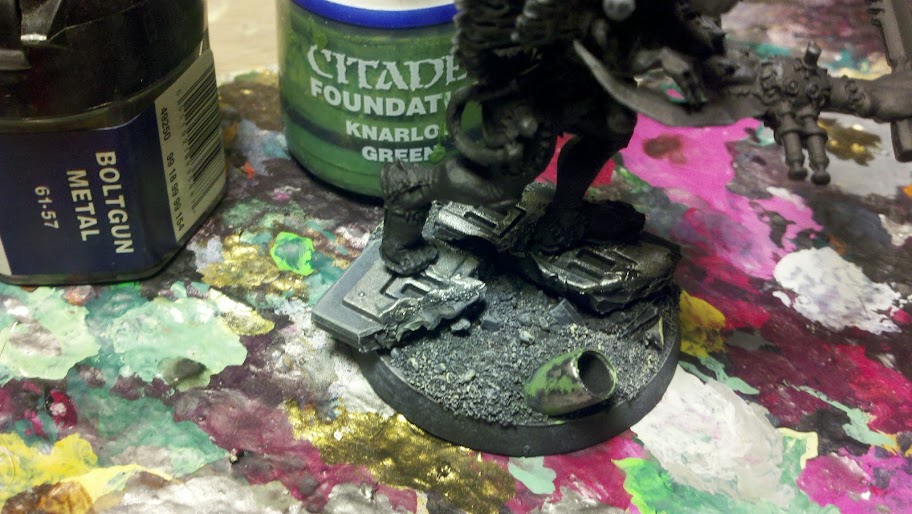 I then wash this down with the thinned Brown Ink. (The Wrack's base has been washed in this pic, the Grot's not)  After this dries I usually do a little more to "weather up" the bases. I usually hit the bases with a little Vallejo pigment powder and Devlan Mud to get a rusty, dirty look. That's it. These two models took about 5 minutes. When they dry it will take another 3-5 to do the weathering. I usually paint about 3-4 models at a time but sometimes do a whole unit of 10 before doing the other paint. Hope this is helpful! | |
|
  | |
masamune
Sybarite

Posts : 445
Join date : 2017-06-22
Location : Paris
 |  Subject: Re: Urban ruin bases on the cheap.(Pic heavy) Subject: Re: Urban ruin bases on the cheap.(Pic heavy)  Wed Jul 12 2017, 16:11 Wed Jul 12 2017, 16:11 | |
| Ahhhhhhh, old school basing. I still got a big bag of "basing stuff" and I'm still using them to do my base. I just find that this add much more quality to the base, and the feeling of making it from A to Z (well, without the sculpting but hey, i suck at that :/). If I remeber it I'll post some of my bases done with most of the same techniques. Also : don't forget you can add wood glue or still water to get a trasnparent layer. This way, it's easy to add some water to your base : - between 2 rocks, - or split your base in 2 : One upper part with debris, one lowa part with water ; hell, you can even add a pipe and make it a sewer exit) Sorry for unburrying such an old post (IK it's discouraged in Forum rules  ) but it really made my day. Edit : Here's several examples using more or less the same techniques, + using some raw slate        Don't hesitate to ask me if you have some questions  | |
|
  | |
Sponsored content
 |  Subject: Re: Urban ruin bases on the cheap.(Pic heavy) Subject: Re: Urban ruin bases on the cheap.(Pic heavy)  | |
| |
|
  | |
| | Urban ruin bases on the cheap.(Pic heavy) |  |
|


